Friday, December 10, 2010

Toy Story anyone??


This was a kick-ass cake to make!! Britt's dance teacher turned 23 yesterday and her sister asked me to make a Toy Story cake for her family party. It seems "Miss Jackie" is obsessed with TS - and it was even the theme of the party!!


I wasn't fooling around with this one. The original idea put to me was a small cake surrounded by cupcakes with each character's face on them. Super cute! But in typical Lisa fashion, I couldn't shake the "too simple" feeling they gave me. Surely I could come up with something that would not only make me stay up all night long, but something th
at was also so far beyond my comfort zone. I think doing the Star Wars cake last month gave me the confidence to try anything. (Yes, a Star Wars cake -- you'll see that soon - PROMISE!)

OK - back to Toy Story....

Her favorite characters are the alien, Woody and Mr Potato Head... So I went to work Googling -- looking for some ideas - and decided upon a 3-tiered cake representing those characters. Did I mention this cake was for only 10 people? I know, I get carried
away sometimes. So they'll have left overs. I did use a 6" and 8" pan, so it's not like it's gigantic!!

For the top tier, I knew immediately that I wanted to make it the alien's head. I used my 1/2 ball pan (6" diameter). That was easy!

I wanted the middle tier reserved for Woody. How do you shrink an
entire character into a 3" tall circle? You focus on the costume -- the thing that everyone recognizes as Woody's. His shirt (and badge, of course). I even made a fondant "rope" to put between the first and second tier.


The bottom tier was going to incorporate a little more than the other 2 individual ones. So I went ahead and decided on a sky/clouds theme - and added some other fun characters around the base tier. Now, let me just say that MY favorite characters are those little Army guys with their feet stuck together. I'm actually giggling as I type that because they were pure genius to put in that movie!!!! I wanted Mr Potato Head to be in true fashion... missing some pieces. And what better way to display the Happy Birthday message than on an Etch a Sketch!!! I even tried to make the lettering square -- because I never really could master the art of Etch a Sketching... (Don't pay any attention to the chocolate cake on the Etch a Sketch... this picture was take after the cake was cut...)


I'm still working on perfecting the base of the cake in fondant. Not so easy to smooth out the fondant and not get creases/folds. I'm getting there -- slowly but surely!

This time around - and because I'm way too obsessive for my own good - I wanted to make sure that Mr Potato Head's "parts" looked authentic -- and I wanted to be able to capture the Army men in true plastic fashion -- but be edible and the same time. I ordered a silicone plastique kit to make my own flexible molds. You can pretty much make a mold out of anything. It's a process... but worth it in the end. I now have silicone molds for Toy Story parts - and can literally pop them out in seconds. Think about it... now I can make "Mr Potato Head Parts" cupcake toppers and have an ear on one, a mouth on another, etc. All without having to shape the actual fondant!! I have a feeling I'm going to be getting some silicone plastique for Christmas!!!

Seriously, doesn't he look all "plastic-y"??


Like I mentioned, this cake was so much fun to make!! I'm thinking I can come up with some other Disney tiered cakes for each movie!


Baby Shower Fun...

Making the goodies for Michelle's shower was so much fun! And if you know me, I tend to get a bit obsessive. Can you believe it? Me? Obsessive? Ha!

After I designed her invitations, had them printed, found a typo, fixed them, and had them reprinted and then mailed, I figured I had better get on the ball and do the edibles.

Let's start with the centerpieces and favors:
I purchased round galvanized tubs and wanted to make the centerpieces look like rubber ducks in tubs. Thankfully, Michelle's friend Allison came to the rescue and offered to make the "bubbles". We were up in the air about oreos or marshmallows - so she tried them both and decided that chocolate covered marshmallows were best. And so she made hundreds.... Yay!

I then wanted to put large duck cookies in each "tub". So I found an awesome cookie cutter in the shape of a large rubber duck and made those. I rolled them out pretty thick because I needed them to be able to stand up in the tub. I added a thick cookie stick and baked them to a light barely-golden brown. When cooled, I cut yellow fondant using the same cookie cutter and applied with piping gel. Easy as pie! At the shower, we stuck the duck cookie into floral foam to stand it upright, added some tissue paper and threw in the marshmallows. They were adorable!

For the favors, I bought a smaller duck cookie cutter, made thick sugar cookies and covered those with fondant, as well. Let me just tell you that "frosting" a sugar cookie with fondant is a gazillion times easier than frosting it with royal icing. And every one of them looks the same!

For the cupcakes:
I wanted to offer three different flavors of cupcakes, so I decided to differentiate between them with different cupcake liners. In all of my craziness, time was slipping away and I knew that I'd NEVER get the fondant duckies done in time - and that would have made me vomit. Sooooo I contacted a seller on Etsy and asked if she could make them for me. She was so awesome to work with and had them in the mail to me in a few days. She was truly a life saver!! Here's her shop if you want to take a look: http://www.etsy.com/shop/TwoSugarBabies I ended up making raspberry filled cupcakes, lava fudge, and peanut butter chocolate. I wasn't too fond of how the peanut butter buttercream was when it was tinted blue, but in the interest of time and sanity, it was what it was!! I frosted the cupcakes with a large round tip and made "bubbles" on top - then set the fondant duckie on top of the bubbles.

For Michelle's personal cake:
I wanted to make her her own cake to take home and enjoy - and she absolutely LOVES my raspberry cupcakes - so it was a no-brainer that she'd be getting a raspberry cake. I made a 6" round cake (3" high), filled it with my homemade raspberry filling and topped it with buttercream. Then I covered the cake with fondant. Let me just say that Michelle LOVED her cake. I gave her extra buttercream frosting, too -- and you know that baby Frankie was certainly pleased with Auntie Lisa that day!!!

Monday, November 29, 2010

Up next... Baby Shower time!!


My dear, sweet sister Michelle is expecting her first baby in a few weeks. Naturally, I knew I'd handle all of the edibles for her shower because you do NOT want to deal with a pregnant woman if she doesn't like her cake. Lucky for me, Michelle's favorite cake of mine is the raspberry. And she got it on overload...

Here's a few pictures to drool over until I can give you the rest of the details...


Halloween Treats....

I know, sorry these are being published so late. It would be thoroughly embarrassing to post a Halloween post in December, but I'm right in under the gun!! I'm trying to catch up on my posts, so now you'll be inundated with cupcakes. Careful what you wish for!!

I had quite a few orders for Halloween weekend and knew immediately which cupcakes I was going to make for the kiddie parties. Mummies. I made these last year and they were a hit - so I figured they would be great, along with some "tombstones" this year.

The mummies are super easy to make - and the tombstones are even easier! Let's face it, I had 300+ cupcakes to make, and I was definitely looking to make something easy!!

Here's how to make the mummies:

The picture below shows 3 stages -- the unfrosted cupcake, the skim coat frosted, and the finished mummy. I always put a thin spread of chocolate frosting underneath the white "gauze" so that the eyes pop from the chocolate and the chocolate makes the space with the eyes look "empty". Ghoulish, if you will.


First start by infusing your cupcake with frosting. Everyone loves a little surprise when they bite into a cupcake and are greeted with frosting. My fans are spoiled now -- because every cupcake they bite into they expect to be infused. I've created monsters. hahaha -- that's my Halloween humor for the day. :)

Gently frost the top of the cupcake with a chocolate frosting (I use buttercream). Then use a pastry bag with a flat tip to shape the outline of where the eyes are going to go. Using 2 M&Ms, place them slightly on the bottom eye strip for the eyes.


Then outline the entire cupcake - and fill in the rest of the "face" (except the eye space) with your buttercream "gauze". Your LAST gauze strip should slightly overlap the TOPS of the M&Ms.


And now for the tombstones...

I saw these online a few days before Halloween and thought they'd be fun to make for the kids. And so, so, so simple! What could be easier than crushed Oreos and Milano cookies??

I infused some chocolate cupcakes with buttercream, then generously frosted the tops of the cupcakes and rolled them in finely crushed Oreos to give the look of dirt. How yummy!! Then, I took a Milano cookie, used an edible marker to write RIP on it, and stuck it in the "dirt". Voila! The kids loved 'em!!


Tuesday, October 26, 2010

Super Mario!!

Ah yes, the Super Mario party for a sweet boy named Ben. It was Ben's 5th birthday and that was the theme he chose. And off to work we went....


The 1-up mushroom cake was huge. Approximately 12" diameter -- a yellow cake, white buttercream and topped with vanilla fondant.

And then we get to the stars of the party.... The cupcakes. Not your ordinary cupcakes -- SUPER MARIO CUPCAKES! These fondant-topped yummies were very time consuming to make. My daughter Britt -- who, I have mentioned before is my biggest helper -- broke her right thumb the day before these cupcakes were due. She was a trooper with the splint on... still carefully molding every detail of Mario.


And we couldn't have Mario without his friends....
Yes, Britt's mushrooms are so much better than mine. She reminds me of that, too.


And the favors... I was asked to create Super Mario cookies to go in the goody bags with Game Stop gift cards. These were also a HUGE hit.


Any theme is doable... In fact.... I'm working on a Toy Story surprise for early December....

Does your Family Tree have some loose leaves??

I don't even remember where I came across this idea, but I instantly fell in love with it. Maybe because I'm a glutton for punishment and nothing I ever make is simple. Something about these random "messy" trees and the cute little leaf sprinkles just made me all warm and fuzzy inside. OK, that's an exaggeration. I just thought these were super cute and wouldn't take too much time to make.


I used a base chocolate cake - and infused the cupcakes with vanilla buttercream. I then tinted the buttercream green (I left the infusion white - because there was just something "odd" about biting into a cupcake and seeing green cream).

For the trees, I melted some Mercken's chocolate in a double boiler and transferred it to a squeeze bottle. I freehanded some trees onto parchment paper - and learned after too many times - to leave a longer truck to stick into the cupcakes. As soon as I piped the trees with the chocolate, I used a tweezer to place the leaves where I wanted them. I know, I could have just sprinkled them on the trees, but I'm too anal for that. I found the leaf sprinkles in a variety pack at AC Moore/Michaels -- but found a 12oz bag of them online, so I'm all stocked up now.

I lightly frosted the cupcakes with my off-set spatula and then used a Wilton grass tip to pipe the grass on the cupcakes. Once the trees were hardened (just a few minutes), I very carefully stuck them in the cupcakes towards the back so I could sprinkle some extra leaves towards the front. Click on the picture below to see a larger image.


I loved this design so much that I think I'm going to use them for our place settings for Thanksgiving dinner. You'll notice that I made larger fondant leaves and put names on them. I'll do that for each guest and put their cupcake on their plate at the table.


Pumpkin Patch.....


I figured I'd do this one first for those of you that need a Halloween idea. I am also making mummy cupcakes on Friday - so be on the lookout for those -- the kids LOVE THEM!! I'm adding these to my holiday order form -- everyone keeps requesting them by the dozens!

Anyway - back to the pumpkin patch. I have a dear friend in Ohio who absolutely loves pumpkin, and a friend at work who loves it just as much. So I decided to make some pumpkin cupcakes 1) to bring to work for my friend(s), 2) add a new Fall flavor, and 3) perfect them enough to send to Nicole in Ohio. My BBB... best baking buddy... Kemely came over and made the pumpkin ones with me earlier this month. Now, I should probably tell you that I dislike pumpkin. And I HATE spices (and am allergic to cinnamon). But making a flavor I don't eat means less to glue to my own ass, right? And if I fatten Erik up from taste testing, I won't look so chunky. Just sayin'.


I decided to use Martha Stewart's Pumpkin Cupcake recipe found
here. And of course, had to decorate it "my way". So I opted for my cream cheese frosting infusion, and THEN I decided to frost the tops with a maple cream cheese frosting. I do like how the maple frosting was a nice tint -- and not so stark white. Ohhh my house smelled scrumptious!!!

Cupcake Recipe:
2 cups all-purpose flour
1 tsp baking soda
1 tsp baking powder
1 tsp coarse salt
1 tsp ground cinnamon
1 tsp ground ginger
1/4 tsp freshly grated nutmeg
1/4 tsp ground allspice
1 cup light brown sugar (packed)
1 cup granulated sugar
1 cup (2 sticks) unsalted butter, melted and cooled
4 large eggs, lightly beaten
1 can (15 oz) pumpkin puree

Directions:
Preheat oven to 350. In a medium bowl, whisk together flour, baking soda, baking powder, salt, cinnamon, ginger, nutmeg, and allspice. Set aside.

In a large bowl, whisk together brown sugar, sugar, butter and eggs. Add dry ingredients and whisk until smooth. Whisk in pumpkin puree.

Divide batter evenly among liners --filling each a little more than halfway. Bake until tops spring back when touched -- approx 20 minutes. Transfer to wire rack and let cool completely.


Cream Cheese Frosting Recipe:
1 stick of salted butter (room temperature)

1 tsp clear vanilla

4 c confectioner's sugar

1 block of cream cheese (not softened) - cut into cubes (*use Philly... trust me)


Beat the butter and vanilla until blended. Add sugar one cup at a time, scraping the sides frequently. Whip in the cream cheese, a few cubes at a time. By adding the cream cheese cold (and not softened), the frosting will retain some of its stiffness. Do NOT overbeat -- just whip enough to blend the cream cheese. If you want to add maple extract, I used 2-3 tsp for a full batch of frosting. You can adjust to your personal taste.


Now to make them pretty....

This is Kemely working hard on some fondant leaves...


After you've infused them with frosting, use a 1M tip to pipe the frosting onto the filled cupcakes. Kemely and I decided to accent these with a fondant pumpkin. Let me tell you, Kemely is an artist! She turned a ball of orange fondant into a pumpkin that looked sooooo incredible!!! Come on - look at these pics!

You can also cut leaves from different colors of fondant or find leaf-shaped sprinkles to add.


I will tell you that these have become a favorite for many of my friends. I brought 36 of them to work with me -- and they were gone in minutes!! I sure hope Nicole loves them just as much!!


Really, how did I lose a whole month??

I know my goal was to blog weekly --- and I'm quite embarrassed that I haven't posted in a month. Life has been HECTIC. I've had so many cookies/cupcakes/cake orders and with it being Halloween, a ton of "Mummy to be" tshirt orders -- that I haven't had time to blog about my love of frosting.

So sit down with a cup of coffee and get ready for some new cupcakes.
I'll be uploading Pumpkin cupcakes with Maple Cream Cheese Frosting and showing you some pics of a Super Mario-themed cake and cupcakes. Oh yes, ANDDDDD I have the cutest idea for you for any Fall party -- or even Thanksgiving!!

I'll get to working on those right now and post them as they are completed....

Monday, September 27, 2010

Little Miss Ladybug Cake & Cupcakes


This was probably the most fun project I've worked on to date. I was asked by a customer to make a ladybug cake for her daughter's first birthday. She showed me something similar to what she wanted and my first impression was "oh boy... how do I do THAT??". And then the wheels started spinning. We're talking about a first birthday party. With kids. And lots of them. What a disaster a tiered fondant cake would be -- to cut, to serve, to eat. So I suggested cupcakes and a smash cake for the birthday girl.

I decided to use butter cream for the smash cake (for those of you who don't know what a smash cake is, it's a little cake that gets "smashed" for photos) because the point of a smash cake is to be, well, messy! Fondant wouldn't give you the same effect. But for the cupcakes, I wanted a clean, smooth look to them that butter cream wouldn't give.

I used a ball pan for the smash cake body. It's pretty big - maybe 6" diameter. For the head, I flattened some black fondant into a round disc. I then used my edible paper and food coloring printer to print a "face", and adhered that to the black fondant disc when it hardened. For the body, I used a star tip for the pink and black, and of course added green "grass" frosting around the base. My hands were KILLING me when I was finished, but it came out great and the customer LOVED it!!


Then it was time for the cupcakes. I needed 75, so I did three different designs - 25 of each. Each had a different cake flavor and a different butter cream infusion and thin spread of frosting underneath the fondant.

My first thought was to have Brittany help with the little fondant ladybugs. They had to be made days in advance because they had to dry enough to make the dots on them with the edible marker. So she helped... for 10 minutes. Then it became boring for her. But that was a HUGE problem because hers were perfectly shaped and mine looked horrendous. No bribery in the world would make her take days to make me ladybugs. Two days before the order was due, at way past midnight.... Erik and I were working on some of the other details while I was stressing about making hundreds of ladybugs.... and there it was. Right there on my counter, caught out of the corner of my eye.... PERFECT!! I noticed that my flip measuring spoons are perfectly shaped (1/2 circle) -- and the smallest size was a perfect ladybug size. Honestly, that shining moment in my non-double oven kitchen made me feel like I had just won the lottery. Ok, maybe not a million dollar lottery, but maybe a $10 scratch-off. So I went to work popping out little ladybug bodies for the next 15 minutes and 200 were done! I went to bed with a huge smile on my face that night!!! Here's Erik putting dots and a stripe on the bug bodies... and a shot of some of the bug bodies waiting for their heads.... haha


I used a round cookie cutter to cut the fondant cupcake covers, used a leaf cookie cutter for the leaf, a flower ones for the flowers, and rolled the stems out and thinned them at the edges. I think the next time I make these, I'll make larger circles on the pink ones. They look a little lost to me.


So, so, so much fun to make these!! And they gave me the courage to make some more fun fondant toppers. I'm working on a HUGE Mario Brothers theme for a party this weekend. Stay tuned for a recap and some pictures!!

Thursday, September 23, 2010

And we have a winner.... well, 2 winners!

While we were away, I told Erik that if the give-away post generated 50 or more comments, I would give 2 baskets away. There were 58 entries, so 2 winners!

I'm running to my daughter's open house at school, but wanted to post this quick....
The winners of the Cupcake Essentials Baskets are:
Sierra and Belle!!

(Yes, I have the random.org results and will post pics later -- but if I don't leave work now, I'll be late and you KNOW you can't be late for first period!! haha)

So Sierra & Bella, email me your addresses and I'll put your baskets together this weekend!
Thank you to all who entered! Be on the lookout for a special holiday give-away. No hints... I'll tell you right now it will be for a Babycakes Cupcake Maker!

Wednesday, September 22, 2010

Yummmmmy Faux-stess Cupcakes


A few months ago, I was Googling like there's no tomorrow, searching for different cupcakes to try. And then I came across the recipe for "Hostess filling". And OMG - it was heaven. Really, who doesn't love marshmallow fluff?

So I figured I'd use my standard go-to chocolate cake recipe and jazz it up a bit by adding a marshmallow creme filling. And while I was at it, I figured, "Hey, why not try to make some ganache, too." So glad I did. They flipped at work!!

So here's the deal...
Make your favorite chocolate cupcakes. Then.....

For the Marshmallow Creme Filling: (I've tried a few recipes for this -- this one is my favorite... I found it on the Evil Shenanigans blog)

2 tsp very hot water
1/4 tsp salt
1 (7 oz) jar marshmallow cream
1/2 cup shortening
1/3 cup powdered sugar
1/2 tsp vanilla

Dissolve the salt in the hot water and allow to cool. (this is EXTREMELY important.... I kept forgetting to dissolve the salt and the filling tasted salty... duh!!)

Whip the marshmallow cream, shortening, powdered sugar, and vanilla until it begins to get fluffy. Add the water/salt mixture and whip well.

I use an open star tip in a pastry bag to infuse the cupcakes with the marshmallow creme filling. I'm not a fan of using an apple corer -- it's messy - and besides, I like to feel the cupcake getting heavy in my hand when using a pastry bag to fill them. You can put sooooo much more filling in them than you get in the Hostess ones!!

I then spread a thin layer of the marshmallow creme on top of the cupcakes and refrigerate for a few minutes to chill them.


Now it's time for the ganache frosting....
I like to keep it simple - so I use 2 ingredients. Heavy cream and chocolate. I had taken a class at the Viking Cooking School and couldn't believe how easy ganache was to make. Now I finally had a chance to make my own!

For the ganache:
1/2 cup heavy cream
6 oz. quality semisweet chocolate (chopped into small pieces so it melts quicker)

Place chocolate into a heat-proof bowl. In a saucepan, bring 1/2 cup heavy cream just to a boil and remove from stove. Pour it over the chocolate and cover with plastic wrap for 5 minutes. When finished, slowly mix with a wire wisk until completely blended.

Dip the tops of the cupcakes into the ganache until the marshmallow creme topping is completely covered. If you need to, twirl the cupcake as you lift it to catch the excess ganache. I rarely have to do this.

For the swirled decor on top, I like to use either butter cream or royal icing. I've used the marshmallow creme, but it seemed to melt, so I don't suggest that! You can use a #3 tip in a pastry bag and pipe a message or design onto your cupcakes, or just go with the signature curls.


Now hurry up and make these!!

Thursday, September 16, 2010

Slacking in September? Nope, just on vacation on "One Happy Island"

No, I haven't been slacking... I'm in Aruba with my hubby for a much needed vacation! But I have to say that I'm definitely having cupcake withdrawals! I had thought about bringing my Babycakes machine, but I had a feeling Erik was looking forward to a "frosting-free" week. Going through the grocery store here in Aruba, it was difficult to stare at the baking aisle and not buy something. I could have picked up a cake mix and ingredients, but the thought of having to use canned frosting, coupled with the sadness that I didn't sneak a pastry bag and 1M tip in my suitcase just made baking in Aruba a passing thought. Well, not passing... I'm still obsessing over it because I could have posted cupcake pics at the pool bar, with the freaking HUGE iguanas, and under a hut on the beach. Next vacation, I promise!

So we met these nice fellow NY'ers yesterday at the pool. And I shared my blog address with Courtney. Courtney, if you have a chance to stop by and are reading this, leave me a comment and I will send you some cupcakes!

Now, we saw a building that said "take time to be nice", so in honor of this amazingly relaxing vacation, I'm going to do just that... take time to be nice... and have my first blog give-away.

My very first give-away is going to be for a cupcake essentials basket, complete with a 1m tip, pastry bags, greaseproof cupcake papers, AND (drumroll please.......) a container of your choice of buttercream frostings (which will be chilled if the winner isn't local). How can you enter this give-away? Simply leave a comment about your favorite cupcake, about your cupcake obsession, or just a "nice" comment. I will be randomly selecting a winner when we get back to the states and get settled (yeah, updating my blog from my iPad is a pain in the ass). So entries will be accepted through midnight on Wednesday september 22nd and a winner selected on Thursday the 23rd.

Thanks for stopping by, hope you enter the give-away, and be on the lookout for a few new cupcakes next week!

Wednesday, September 1, 2010

September already? Back to School with a favorite cookie-inspired cupcake

Last month's poll for which cupcake to feature in September was close -- but my Oreo Cookies & Cream cupcake came out the winner! I have to say, this is one YUMMY recipe!! I never make this cake base from scratch because I found the perfect adaptation using a white cake mix. And when something is this delicious, why screw around with it, right??

Here's the adapted cake recipe:
1/2 bag of Oreo cookies (not double-stuff)

1 box of white cake mix
1 cup Sour Cream
1/2 cup Canola or Vegetable Oil

3 Large eggs
1 tsp vanilla

And the frosting recipe:

1 stick of salted butter (room temperature)
1 tsp clear vanilla
4 c confectioner's sugar
1 block of cream cheese (not softened) - cut into cubes (*use Philly... tr
ust me)
some Oreo crumbles
Mini Oreos as a garnish (like in the 100 calorie pack/cup)


Now how do you make these delicious creations?? Preheat oven to 350.
To make the cupcakes, mix the sour cream, oil, eggs and vanilla together. When combined, add the white cake mix. Then, break up about 15 cookies into smaller pieces. I do not put them in a blender -- I like pieces of cookie in my cupcake, not just crumbs. Fold them into the batter - do not beat or they will become crumbs.

Spoon them into your cupcake papers - filling them 2/3 of the way. Bake for approx 20 minutes -- until the tops begin to look light golden and spring back to the touch. Remember, one extra minute in the oven makes a HUGE difference.

When done, place on cooling racks until completely cooled. Always make sure your cupcakes are completely cooled, especially when using a cream cheese based frosting! If you've watched Cupcake Wars, you'll understand what happens when you frost hot cupcakes!!

Now for the cream cheese frosting:

Beat the butter and vanilla until blended. Add sugar one cup at a time, scraping the sides frequently. Whip in the cream cheese, a few cubes at a time. By adding the cream cheese cold (and not softened), the frosting will retain some of its stiffness. Do NOT overbeat -- just whip enough to blend the cream cheese. Then fold in the Oreo crumbles (don't overmix the crumbs in - just fold them in -- otherwise the frosting will turn gray).

To frost, I use an off-set spatula to lightly frost the cupcake - then press it into some Oreo crumbs. Then, using a round tip or just a coupler, pipe the frosting onto the cupcakes and garnish with a mini Oreo.

Your kids, hubby, friends, (and you) will LOVE these cupcakes if you're a fan of Cookies & Cream!!

Wednesday, August 25, 2010

Marshmallow Fondant

Now, before you wrinkle your nose and say "eeew" to yourself because I used the "f" word (fondant.... obviously)... keep an open mind and realize it's not the store bought stuff that comes in a foil bag. This is made with mini marshmallows. And really, who doesn't love mini marshmallows?

Let me just say that I wish I had the camera ready last night. Here's the scene: I'm in the kitchen at 11pm - just ran out of fondant and need a little more for an order that had to ship today. Not a big deal - I'll just whip some more up. Britt, the best helper ever... is approaching her bored/too tired to help stage, Erik is wiped from working his midnight tour - and I'm longing for a Friendly's sundae. Britt's helping make the fondant - and as I'm mixing in the confectioner's sugar, some insane subconscious thought runs through my mind and makes me use BOTH hands to grab the fondant out of the bowl and knead it. Well, that IS what you are supposed to do. EXCEPT... I forgot to put Crisco on my hands. So envision sticking both hands up to your wrists into 2 containers of Fluff.... now try to clean them off with no clean hands available. Thankfully, Britt helped free me up - and then was more than happy to escape to her room before I found something else for her to do that she clearly didn't want to do!!

Once I had the fondant all blended/kneaded, it was smooth sailing. Next time, when I have to make an entire batch of one color (like tomorrow when I make pink for a ladybug party order), I'm tinting the water and coloring the fondant BEFORE the sugar is mixed in.

Last night's project was monkey cupcake toppers for my friend Jessica.... they were being shipped south, so they were just the toppers. No cupcakes. Tonight I'll be making 100+ little lady bugs to prep for the party order this weekend. I love working with fondant - especially when Britt is home to help because her artistic ability to mold fascinating things is a HUGE help! (Read... she'll be making the lady bugs....).


Oh - this fondant is also perfect for rolling out and laying on cakes. It's soft and fluffy - and tastes delicious. Actually, I'm hoping to find time to make a special surprise for Natalie, my son's girlfriend -- who just came back from a Semester at Sea. Here's a rolled fondant cake I made my mom for Mother's Day. It looked much smoother in person than it does in the picture... promise!

Here's the recipe for the Marshmallow Fondant that I make:
  • 1 (16 ounce) package miniature marshmallows (I can only find 10.5oz, so I use a bag and a half for each batch)
  • 4 tablespoons water
  • 1 teaspoon vanilla extract (use clear if you want white fondant)
  • 2 pounds confectioners' sugar, divided (7 cups in the mix, 1 cup reserved for kneading)
Directions:
  1. Place the marshmallows in a large microwave-safe bowl, and microwave on High for 30 seconds to 1 minute to start melting the marshmallows. Carefully stir the water and vanilla extract into the hot marshmallows, and stir until the mixture is smooth. Slowly beat in the confectioners' sugar, a cup at a time, until you have a sticky dough. Reserve 1 cup of powdered sugar for kneading. The dough will be very stiff and VERY STICKY!!!
  2. Rub your hands thoroughly with Crisco (some people like a butter flavor and rub their hands with butter instead), and begin kneading the sticky dough. As you knead, the dough will become workable and pliable. Turn the dough out onto a working surface dusted with confectioners' sugar and continue kneading until the fondant is smooth and no longer sticky to the touch, 5 to 10 minutes.
  3. Form the fondant into a ball, wrap it tightly in plastic wrap, and refrigerate overnight. To use, allow the fondant to come to room temperature, and roll it out onto a flat surface dusted with confectioners' sugar. (**Note: Sometimes, like last night, I don't have time to let it sit overnight -- and haven't had a problem with using it right away)
I don't have many fondant pictures, but will take more this weekend of the ladybug cupcake order.... until then....
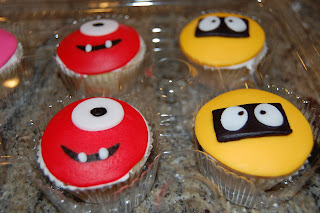
Some Yo Gabba Gabba cupcakes:
And this is Britt (modeling some flower cupcakes she made on Mother's Day)...

Monday, August 23, 2010

Make a Splash!

So you may remember in a previous post that I always use a pastry bag/tip to frost -- but on certain projects, that's just not possible. I had a party order last week for a friend's son's birthday pool/pizza party. She's a great mom - and planned a wonderful party for the kids. They had pizza makers come with their portable ovens and had each of the kids make their own pizzas. Great fun! It was also a pool party - and what better treat than cupcakes decorated in the theme! (of course!!).

So I made these..... vanilla cake with a vanilla butter cream infusion - topped with delicious butter cream frosting - and a cookie!! The cookies are decorated with an edible printed frosting sheet, attached to the cookie with royal icing and edged in sanding sugars.

It was also Matthew's daddy's birthday - so he was quite surprised to see a cookie for him, too! it totally made my week when my friend Roseann left me a 2-minute voice message on Monday telling me how everyone LOVED the cupcakes and how Matthew savors one each night after dinner. Nothing is more precious than a little boy with a blue tongue savoring his birthday sweets!!

Here's a close-up of the edible printed papers for the cookies...


Basic Buttercream Frosting... I've tried probably a dozen recipes for basic vanilla buttercream. They're all so similar - many just a little more of this or a little less of that. Here's the recipe for one that I don't find obnoxiously, overpoweringly sweet...

Ingredients:
2 sticks of butter, softened
3 1/2 cups confectioners sugar
1 tsp milk
1/2 tsp vanilla (I use a potent vanilla - if you use regular vanilla, increase to 1 tsp)

Cream butter, then add sugar one cup at a time. When combined, add milk and vanilla. If you like the frosting more fluffy, add a little more milk.